UiPath community edition is a fully-featured version of the UiPath tool for individuals and developers. It has been one of the reasons UiPath has been so popular. UiPath now has two different flavors of the Automation development environment – Studio and StudioX.
StudioX is UiPath’s effort to build a development environment for people with no prior software background or coding skills. Whereas, UiPath Studio, the original development environment is meant for developers to build more complex automation.
In this post, we take a look at Studio and StudioX installation. Both are the same installable – you can choose which development environment you like to start with during the installation process. You can also switch between Studio and StudioX after you install it.
Let us start with the UiPath Studio install.
Installing the UiPath Studio Community Edition
Let us walk through the steps to install UiPath Studio Community Edition. If you are visual and like to just watch the video, scroll below.
- Let us start by going to the UiPath Community edition page at www.uipath.com/developers/community-edition
- Go to the “Start Trial” or “Get Community Edition” options.
- Look for “Community cloud” and click on “Try it”
- Sign-up/Register with Uipath by providing the information. Once you submit the information, it would open up the UiPath portal.
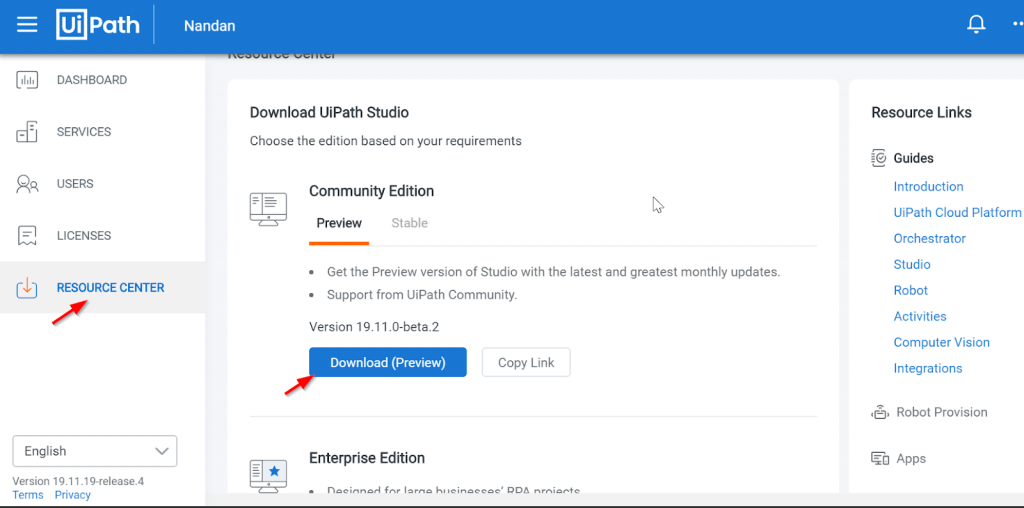
- In the left pane, choose “Resource Center” and then Download the “Community Edition” as shown above.
- An executable setup file (UiPathStudioSetup.exe) would download.
- Go ahead and double click this installable to install the UiPath community edition Studio.
- When you get to the License screen, click on ‘Activate Community Edition’. The licenses for UiPath Studio and Robot will be activated.
- Congrats! A browser tab should open up indicating that UiPath has been installed.
- Go to Windows “Start” and look for “UiPath Studio”. Click on it to open the Studio.
Here is a quick 1-minute video of the Studio install process.
Installing the UiPath StudioX Community Edition
The install process is same as Studio – download the same installable and go through the installation. On the last screen, you can choose to start with StudioX. Here is a quick video of the process.
You can also switch to Studio or StudioX after the install. You can switch the version from the profile page.

That was a quick look at installing the UiPath development environments – Studio and StudioX. These different versions of Studio are targeted at different audiences as we explore here – What is the difference between Studio and StudioX.
If you are new to RPA, start with RPA 101: The Complete Beginner’s Guide to RPA Platforms
